AMD just released a new series of GPUs the RX570 and RX580 a couple of weeks ago. Those are upgraded versions of the RX470/RX480. The mining community was anticipating the new RX5xx series; however, those two new models received mixed reviews. The reason is that they have a higher power consumption while producing the same hashrate which makes mining less effective (longer ROI). But there is a solution for that.
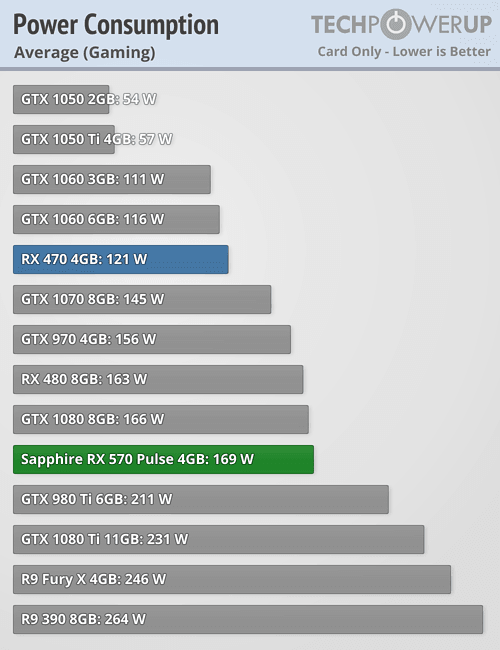
Power consumption comparison
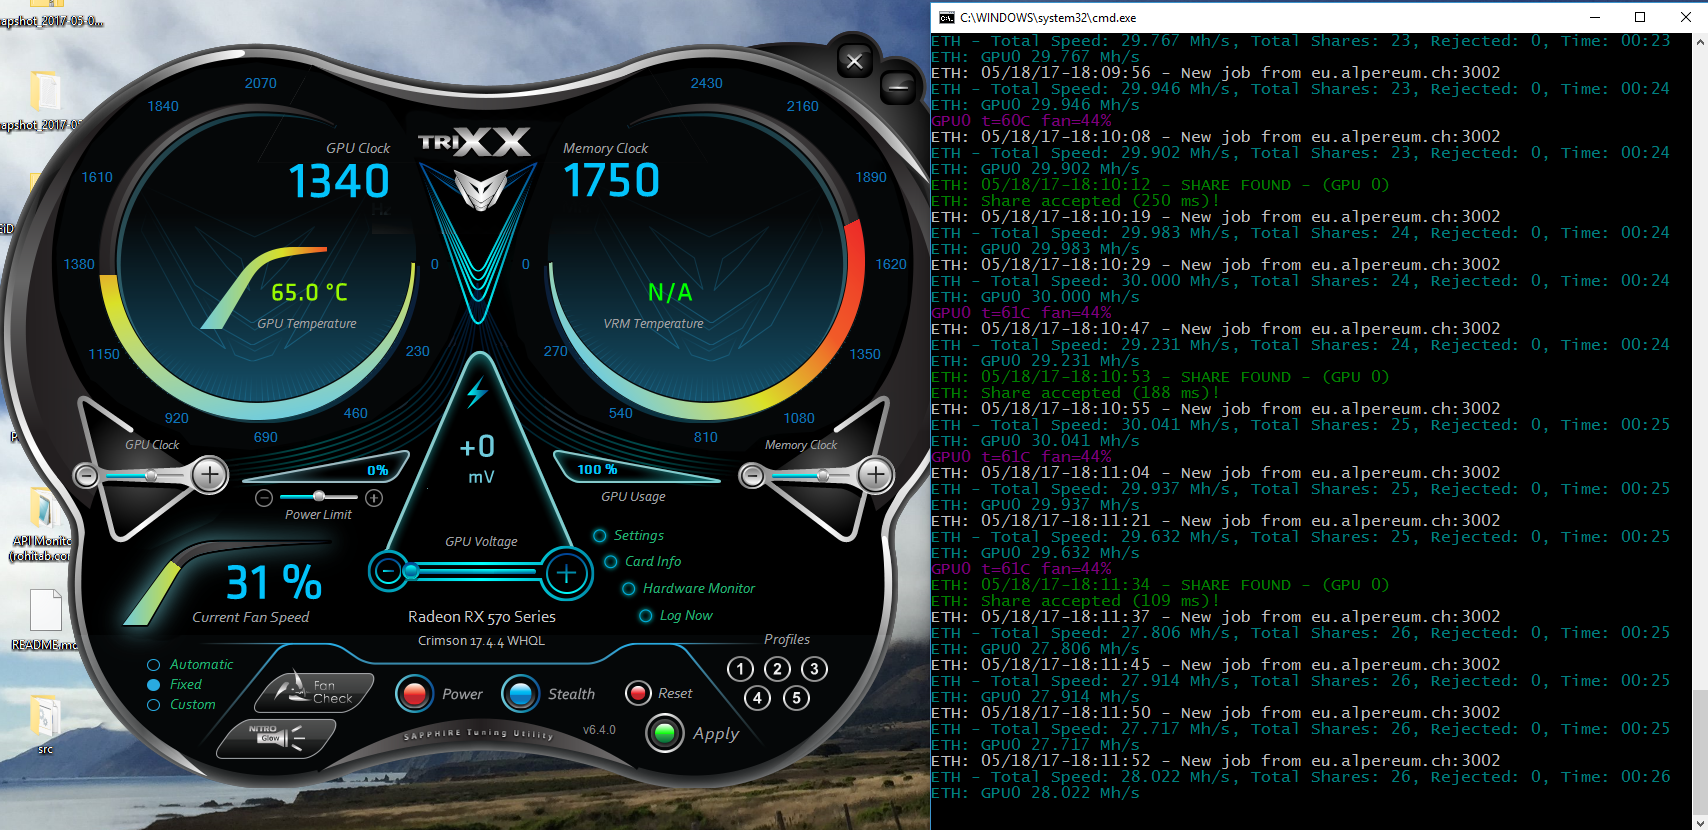
In the following, I’ll explain how to tweak the BIOS of an RX 570 on Windows 10 x64 and present the results. I used the Sapphire NITRO+ Radeon RX 570 4GB card. From a stock RX 570, you can expect an Ethereum hashrate between 22-24 MH/s @130W as can be seen in the screenshot below.
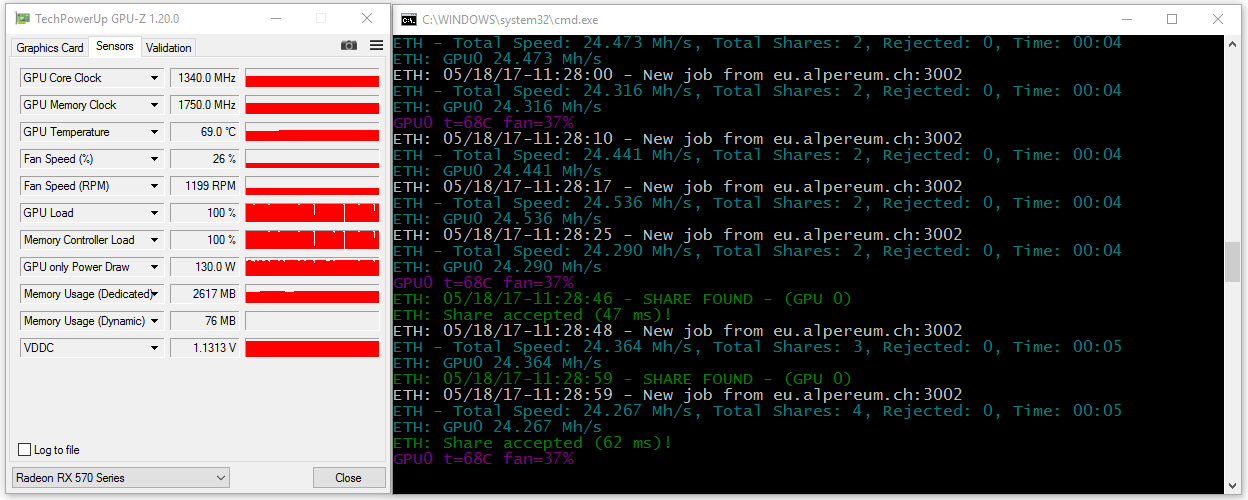
GPU sensor values and Ethereum mining hashrate stock BIOS
Preparation
Before we start you need to download the following drivers/tools:
- AMD Driver Crimson ReLive Edition 17.4.4
- AMD/ATI Pixel Clock Patcher
- AMD/ATI ATIFlash
- GPU-Z
- PolarisBiosEditor 1.4
- MSI Afterburner or Sapphire TRIXX (I used Sapphire TRIXX because MSI Afterburner didn’t let me undervolt more than -96mV)
Step 1 – Driver
- Uninstall old AMD Driver and restart (maybe it works with other driver versions, I performed the steps with 17.4.4)
- Install AMD Driver 17.4.4 and don’t do the restart at the end of the setup.
- Run the Pixel Clock Patcher executable atikmdag-patcher.exe.
- If all limits are found, click “Yes” to patch and sign. If a limit is not found or if multiple matches are found, the patcher needs to be updated.
- Reboot
Step 2 – BIOS backup
- Unzip atiflash_274.zip.
- Change to the folder where you unzipped the files to and run ATIWinflash.exe as administrator.
- Before you start flashing a new VBIOS, make sure to save a backup of your original ROM! In case of a bad flash, or bad settings, you can revert to your original ROM.
- By using ATIWinFlash, choose the card you want to create a backup for. Then click on the Save/Speichern button to make a backup and save it to a location of your choice. I named it rx570_original.rom.
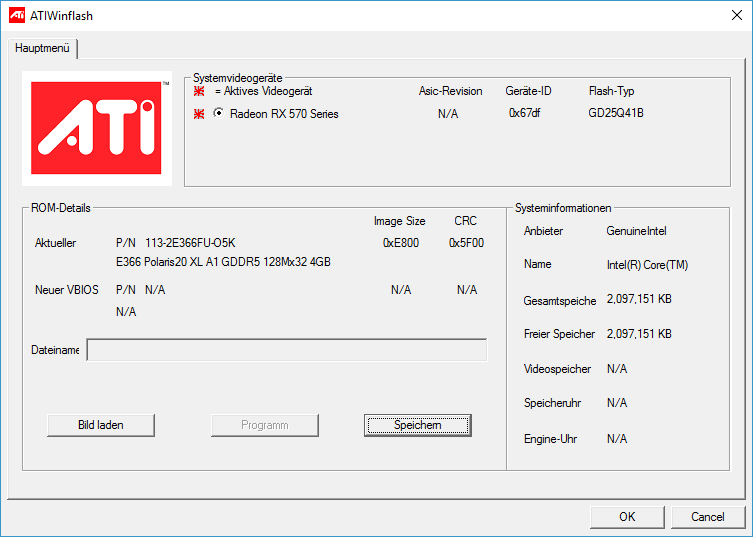
Backup original BIOS
Step 3 – BIOS customization
- In this step, we want to customize the memory straps (timings) of the GPU in the BIOS. If you’re interested you can find an explanation why we want to do that in this post.
- It is important to know that not every RX570 has a memory chip from the same supplier. Hence, different parameters for the memory strips are needed.
- My card has SAMSUNG memory, you can verify the memory chip supplier by using GPU-Z (screenshot below).

GPU-Z memory type
- Run PolarisBiosEditor.exe.
- Click on the OPEN button and choose the rx570_original.rom from step 2. It should look like in the picture below.
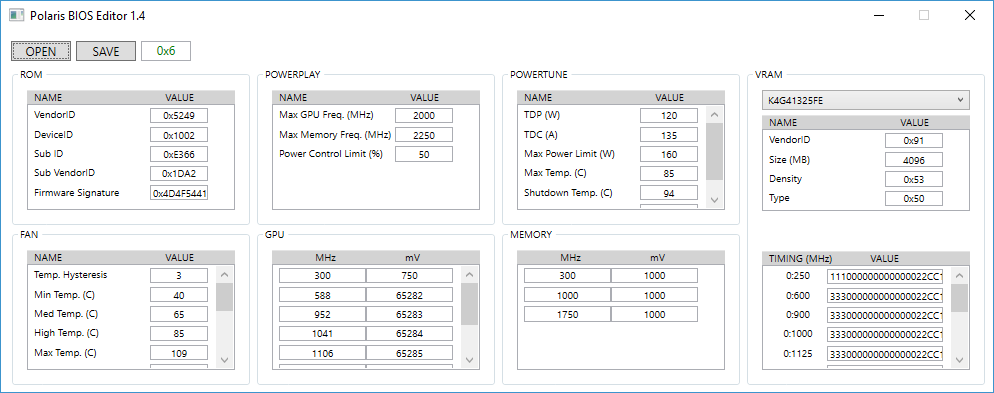
Stock BIOS in Polaris BIOS Editor
- Down right is a table with timings, for Samsung memory copy the value from 0:1750 to 0:1900 and 0:2000.
- Click on the SAVE button and choose a name for the modded BIOS e.g. rx570_custom1750.rom.
Step 4 – Flash the modded BIOS
- Run the ATIWinflash.exe again as in step 2.
- Click on the Bild laden/Load button and select the modded bios that we created in step 3 (e.g. rx570_custom1750.rom). Important: if you have multiple GPUs in your computer make sure that you select the right one.
- Hit Programm. Your desktop will freeze while the ROM is written to the card. After that, you are prompted to restart your machine. Click yes.
- After restarting your card runs with the new VBIOS ROM.
Step 5 – Tweak parameter
- In this step, we want to tweak GPU clock, memory clock, and voltage.
- In order to monitor the Ethereum hashrate, you should now start your favorite mining tool. I use Claymore’s Miner v9.3.
- In parallel start Sapphire TRIXX.
Sapphire TRIXX and Claymore miner
- Now increase the memory clock in 50 MHz steps and click apply after each step. You should that see the mining hash rate increases.
- If you go too high the hash rate will decrease or the screen freezes (in that case reboot and stay below the clock rate).
- If you found a sweet spot you can play around with the GPU clock and decrease the voltage.
- For my card 1239 GPU clock / 2175 memory clock / -150mV works best, I’ll get a bit over 30 MH/s (if I don’t use the computer) at 100-105W (according to TRIXX).
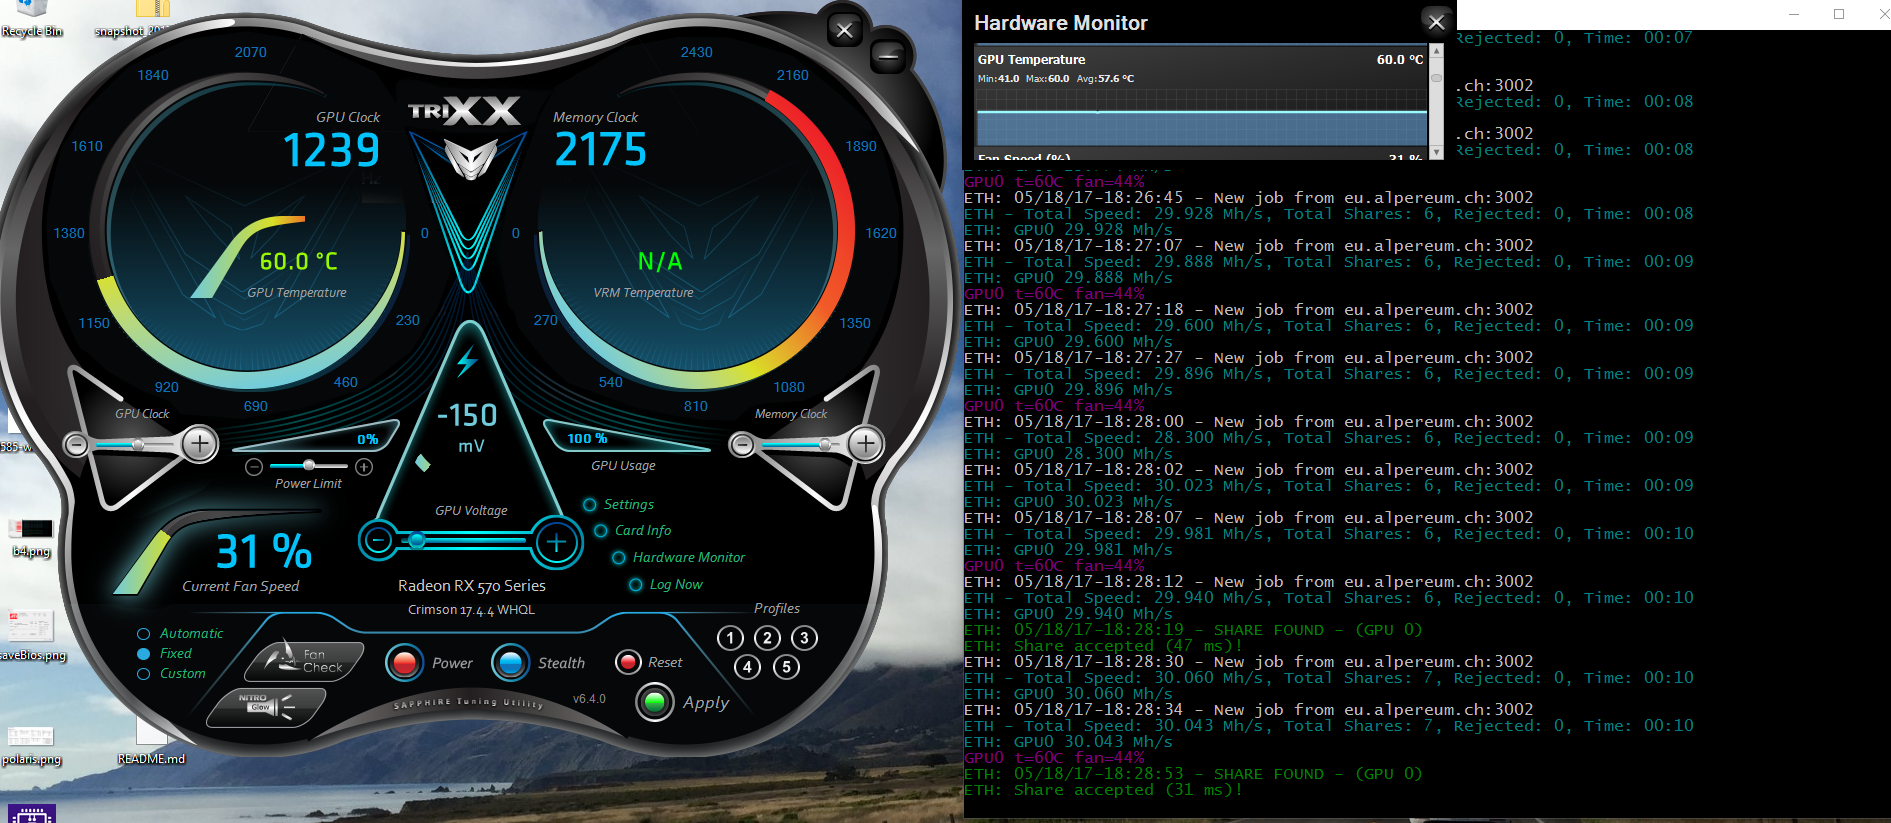
Sweet spot 1239/2175/-150
- Save your best config as a profile. After each reboot you just have to load the profile, click apply and start mining!
I hope you liked this article. If it helps you my tip jar is available at
0x7AaBa7974fBeE2e8EBcE16A52718E389EAAD7bd3
Thanks for reading and happy mining!!!
Hi, first, great tutorial, tnx a lot.
Is it possible(after bios mod) to run rig with 6 of these cards on 1000W power supply?
Best regards.
Hey Bagi,
Great to hear!
I haven’t build a rig yet but I would go with a bigger one e.g. at least 1200W or multiple PSUs (e.g. 2×650-750 Gold PSUs).
It can happen that an error occurs and the overclocking/undervolting settings are set to standard clock/voltage while mining. In that case you would have to calcualte with 150Wx6 + rest of the system, let’s say 200W = 1100W.
Cheers
That’s what I have thought. Thanks a lot. I’am gonna use one PSU powered with 1250W. Your tutorial is very good written and easy to understand. Only if you can post what are the parameters for GPUs in case of Hynix memory module.
One more question, is it really power consumption of one this card about 105W after modding? Seems too low according to reviews on Internet saying that average power consumption on 30M/h is around 130-150W?
Great job and thanks once more.
Cheers.
From what I’ve read it’s possible to copy the 1500 straps to 1750,1900 and 2000 with Hynix memory. I would start with 1750 though.
Well, the power consumption is measured internally the actual power consumption (at the wall) can be a bit higher.
An example with Hynix:
Sapphire 570 4GB Nitro+ Hynix – strap 1750 – 1100/2050/-96mv-gpu/+20powertarget = 29,3MHs @ cca 156 on the wall
Pingback: What are memory straps and why should I modifying them – AMD overclocking for Ethereum mining | Hardware Hood - Ethereum, Mining and Blockchain
Spot on with this write-up, I actually believe that this web site needs
far more attention. I’ll probably be returning to read more, thanks for the information!